Blog: Technical Guides

New features |
Integration
By: Chris Chandler
11 March 2026
Test and safely manage changes to sync configs without configuring by hand
Omnata's sync config branching has been thoroughly redesigned in the new UI. We've made branching concepts clearer and easier to use, refined the branching types to be more guided, and introduced a simpler, more intuitive flow. This ensures users don't end up with incompatible configurations, and gets you to the most common testing scenarios faster.
What is branching?
In software, branching is a version control concept that creates a separate, parallel line of development from a main codebase. It lets developers work on features, experiments, or bug fixes in isolation, without affecting the stable main branch. Once the work is complete and tested, it can be merged back.
In Omnata, the concern isn't multiple developers working on the same code — it's being able to test changes to a production data pipeline before they go live, and applying those changes without manually replicating configuration parameters by hand.
Why do I need it?
Branching lets you test sync configurations before putting them into production, and copy a tested config across with a click instead of rebuilding it from scratch.
Data pipelines have many downstream dependencies, so robust change management matters. You don't want to break something that people are relying on.
Branching is most important for outbound syncs (Reverse ETL) from Snowflake to a target system. Writing records carries more variability and potentially more severe consequences if something goes wrong. By contrast, inbound syncs — ingesting data into Snowflake — are inherently lower risk, since you're not modifying or deleting existing records.
Common branching use cases
Fully separate test and prod environments — with change control
Some teams follow a formal promotion process: no change goes to production without being tested in a sandbox first, reviewed, and explicitly signed off. If that's you, Omnata's branching maps directly onto that workflow. Configure and test in your sandbox environment, review the diff, and copy the config to production when it's approved.
Fully separate test and prod environments — sandbox only
Others have a sandbox but don't follow a strict process — it's more of a place to experiment and break things freely before making changes to prod. Branching still helps here: you get the safety net of testing in isolation, and Copy Config means you don't have to manually recreate whatever you landed on once you're happy with it.
Testing in production
Many applications only provide one environment, so changes are applied directly to the production system. Common workarounds include:
Syncing a small number of known test records before running the full sync.
Using a test location inside your production instance — a test Slack channel, a test object, or some other logical segregation — before switching to the real target.
Omnata's branching types
Omnata’s branching features are simple yet flexible enough to suit several Snowflake deployment and test/prod environment scenarios.
Single Snowflake Account
Multiple target environment — fully segregated environments (e.g. Salesforce sandbox vs. production).
Single target environment via alternate source — filter records or use an alternate table as the test source.
Single target environment via target location toggling — switch between a test and production object, channel, or folder inside the same app instance.
Multi Snowflake Account
Account-context aware stored procedures for sync creation and modification that can be managed in the source control tool of your choice.
Branching in detail
Below we visualising the data flow when using config branches to help you grasp the concepts.
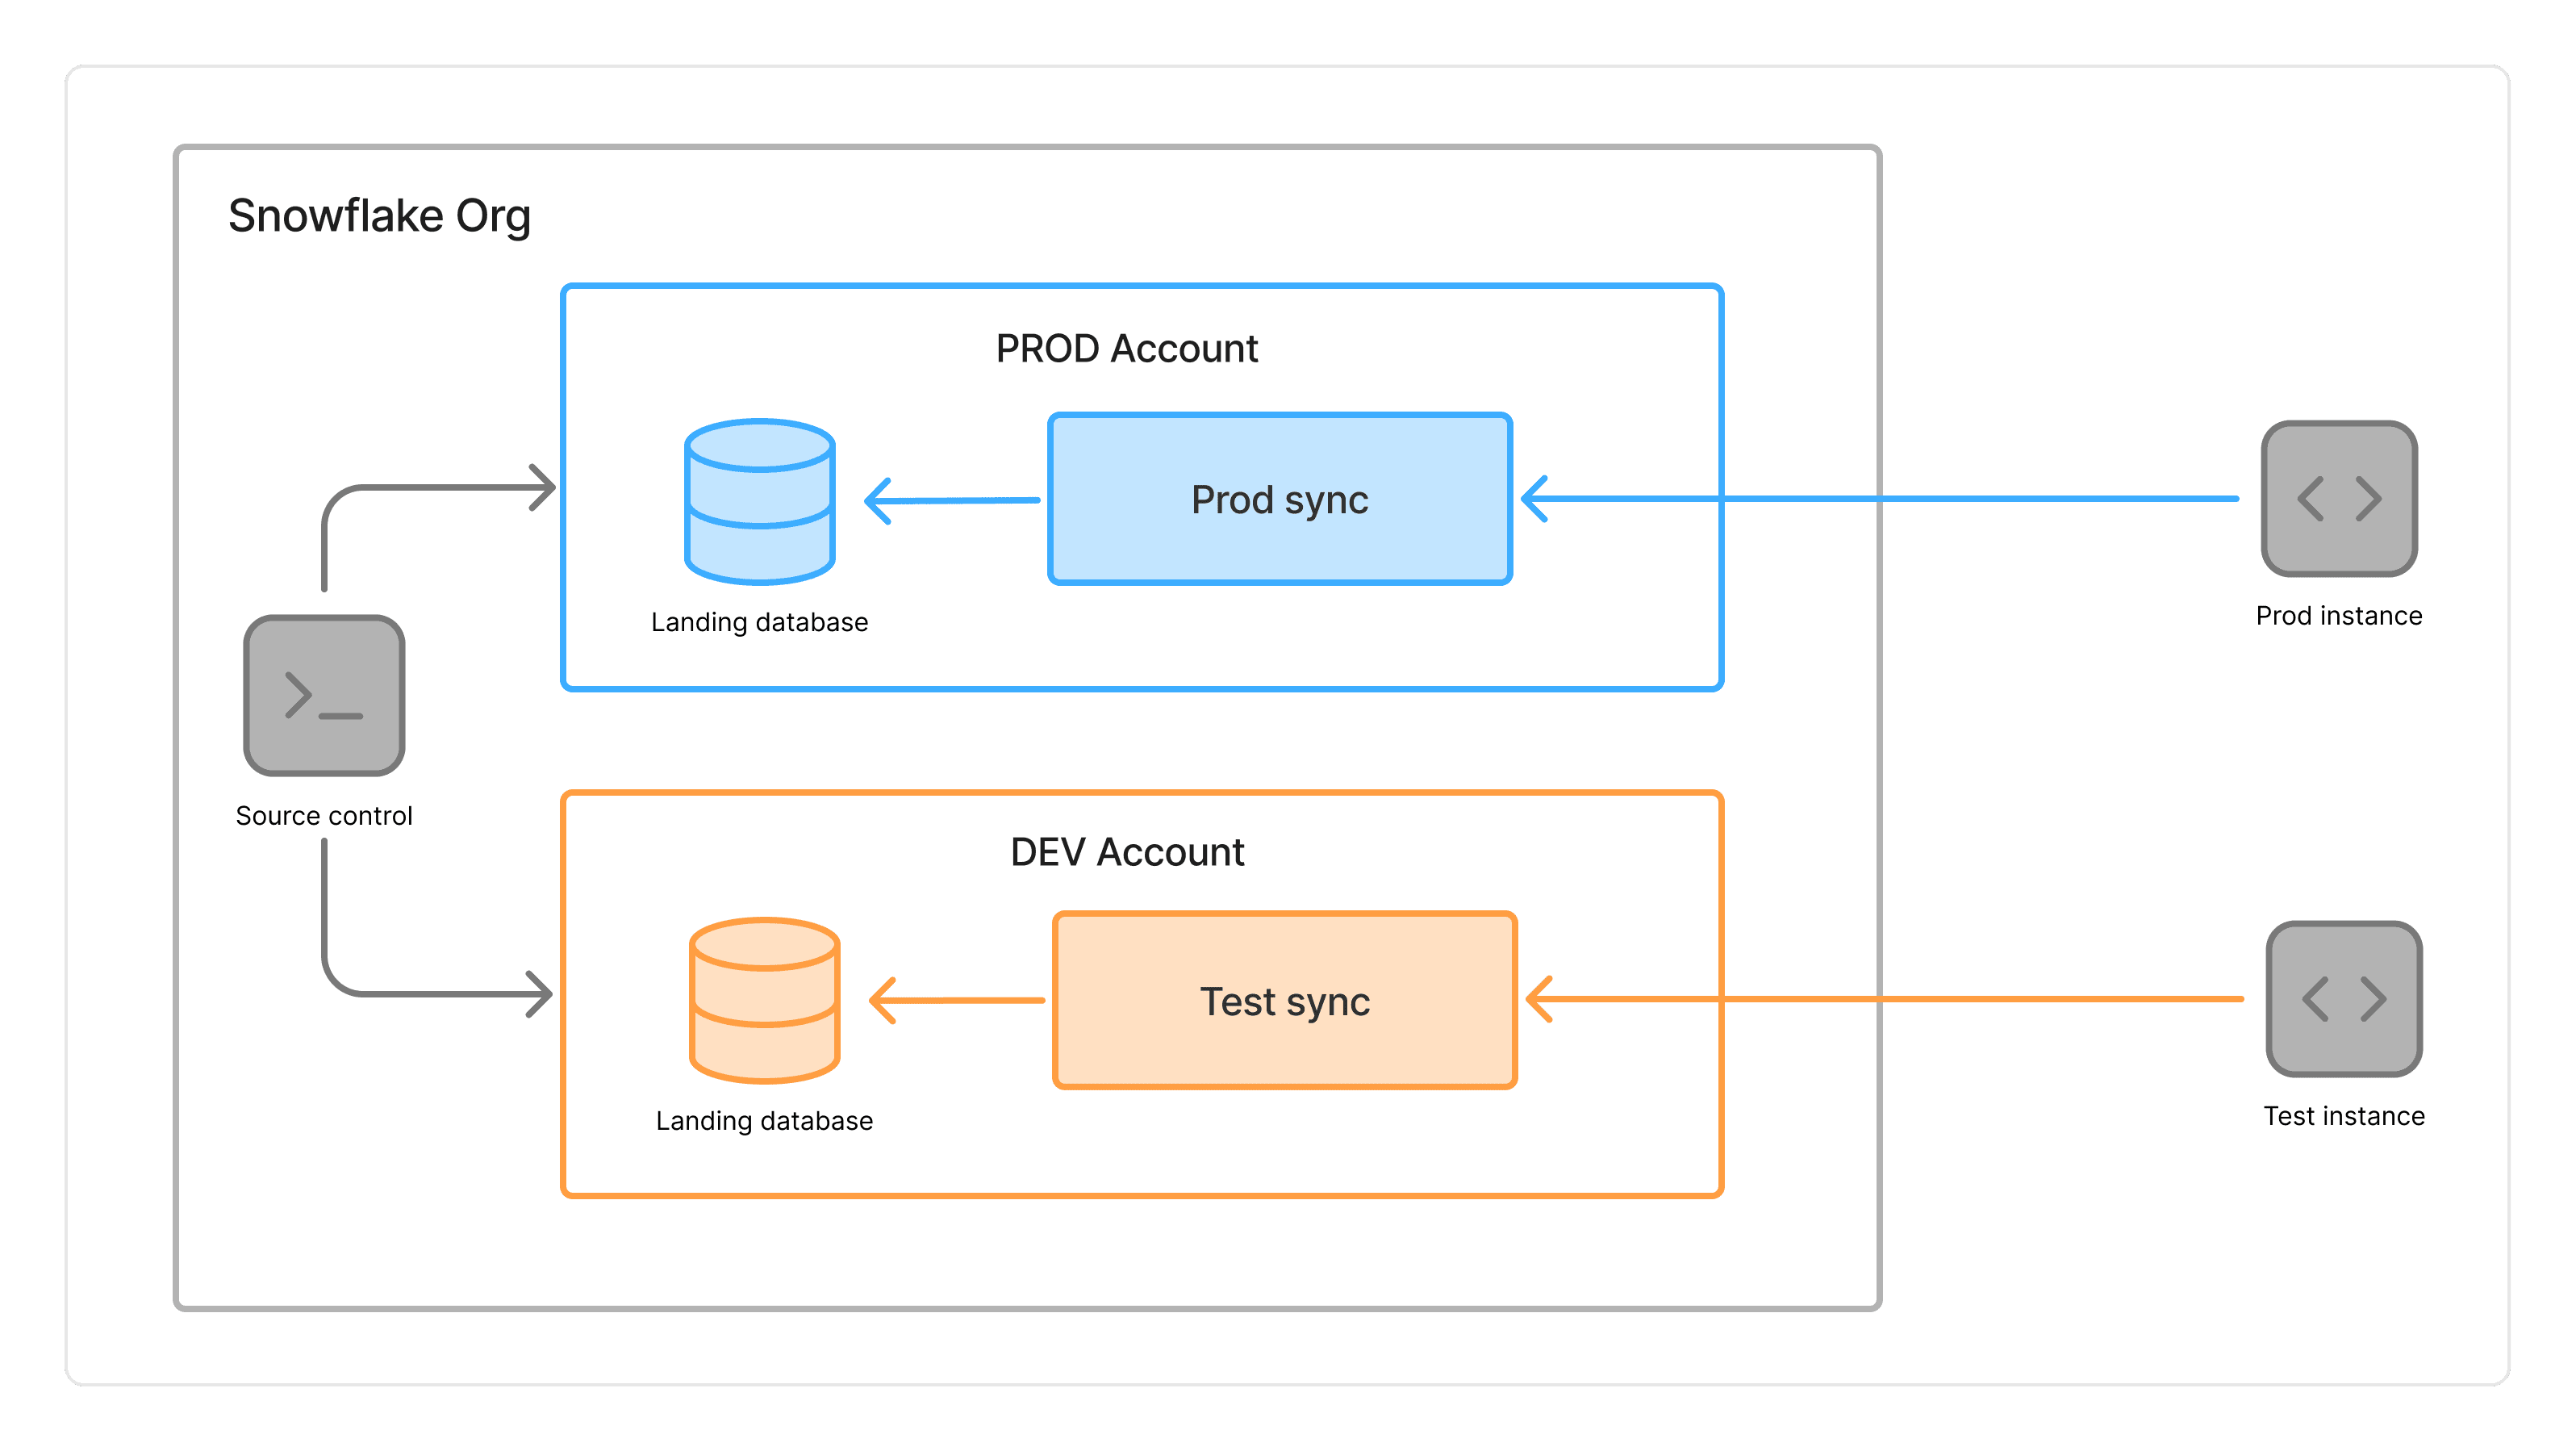
Single Snowflake Account - Multi target environment
When you have separate target environments, each connection in Omnata is designated as either production or test. You enable branching on a production sync, and each branch points to the appropriate connection — keeping your test and production systems cleanly separated.
Inbound syncs
Branch the inbound storage location between test and production target environments. Configure a custom storage location for the sync using the branch_name variable to route data to different databases or schemas. Learn more about custom storage locations →

Outbound syncs
Each branch of the sync points to a different connection — one for your sandbox, one for production — so your field mappings and sync logic can be tested end-to-end before any data reaches the production system.

Single Snowflake Account - Single target environment (outbound syncs only)
Alternate source: alternate table
Use this when you've already created an alternate source table from the real data — for example, you've limited the record count or applied a WHERE clause.

Alternate source: filtered records
Use this when you have a small number of known test records that can be used for testing.

Target location toggling
Use this when your target application has a test object, channel, folder, or other logical segregation inside the production instance. The branch toggles to the test location; the main points to the real one.

Multiple Snowflake Accounts
Use this when you have multiple Snowflake accounts under the one Org and you need fully segregated Omnata application installs and connections to your target environments. You can manage Omnata configs in the source control tool of your choice.
How to use branching to test a sync before running it in production
These steps apply if you have a single Snowflake account with separate Dev and Prod instances of the target endpoint.
Create your connections
The first thing Omnata asks when creating a connection is whether it is production or test. This determines how you can branch a sync later. If you get this wrong, you can always change it by editing the connection.Create a sync using the production connection
Configure the sync using the production connection. The production connection will be on the Main branch. If you don't yet know which objects to select or fields to map, fill out the bare minimum or use a placeholder — you can come back to this later. Set the sync schedule to Manual so the sync won't run automatically until you're ready.Create a branch using the test connection
Configure this sync fully, since this is the one you'll run first as a test. Again, when you reach the Deployment step, set it to Manual unless you want to test the schedule as well.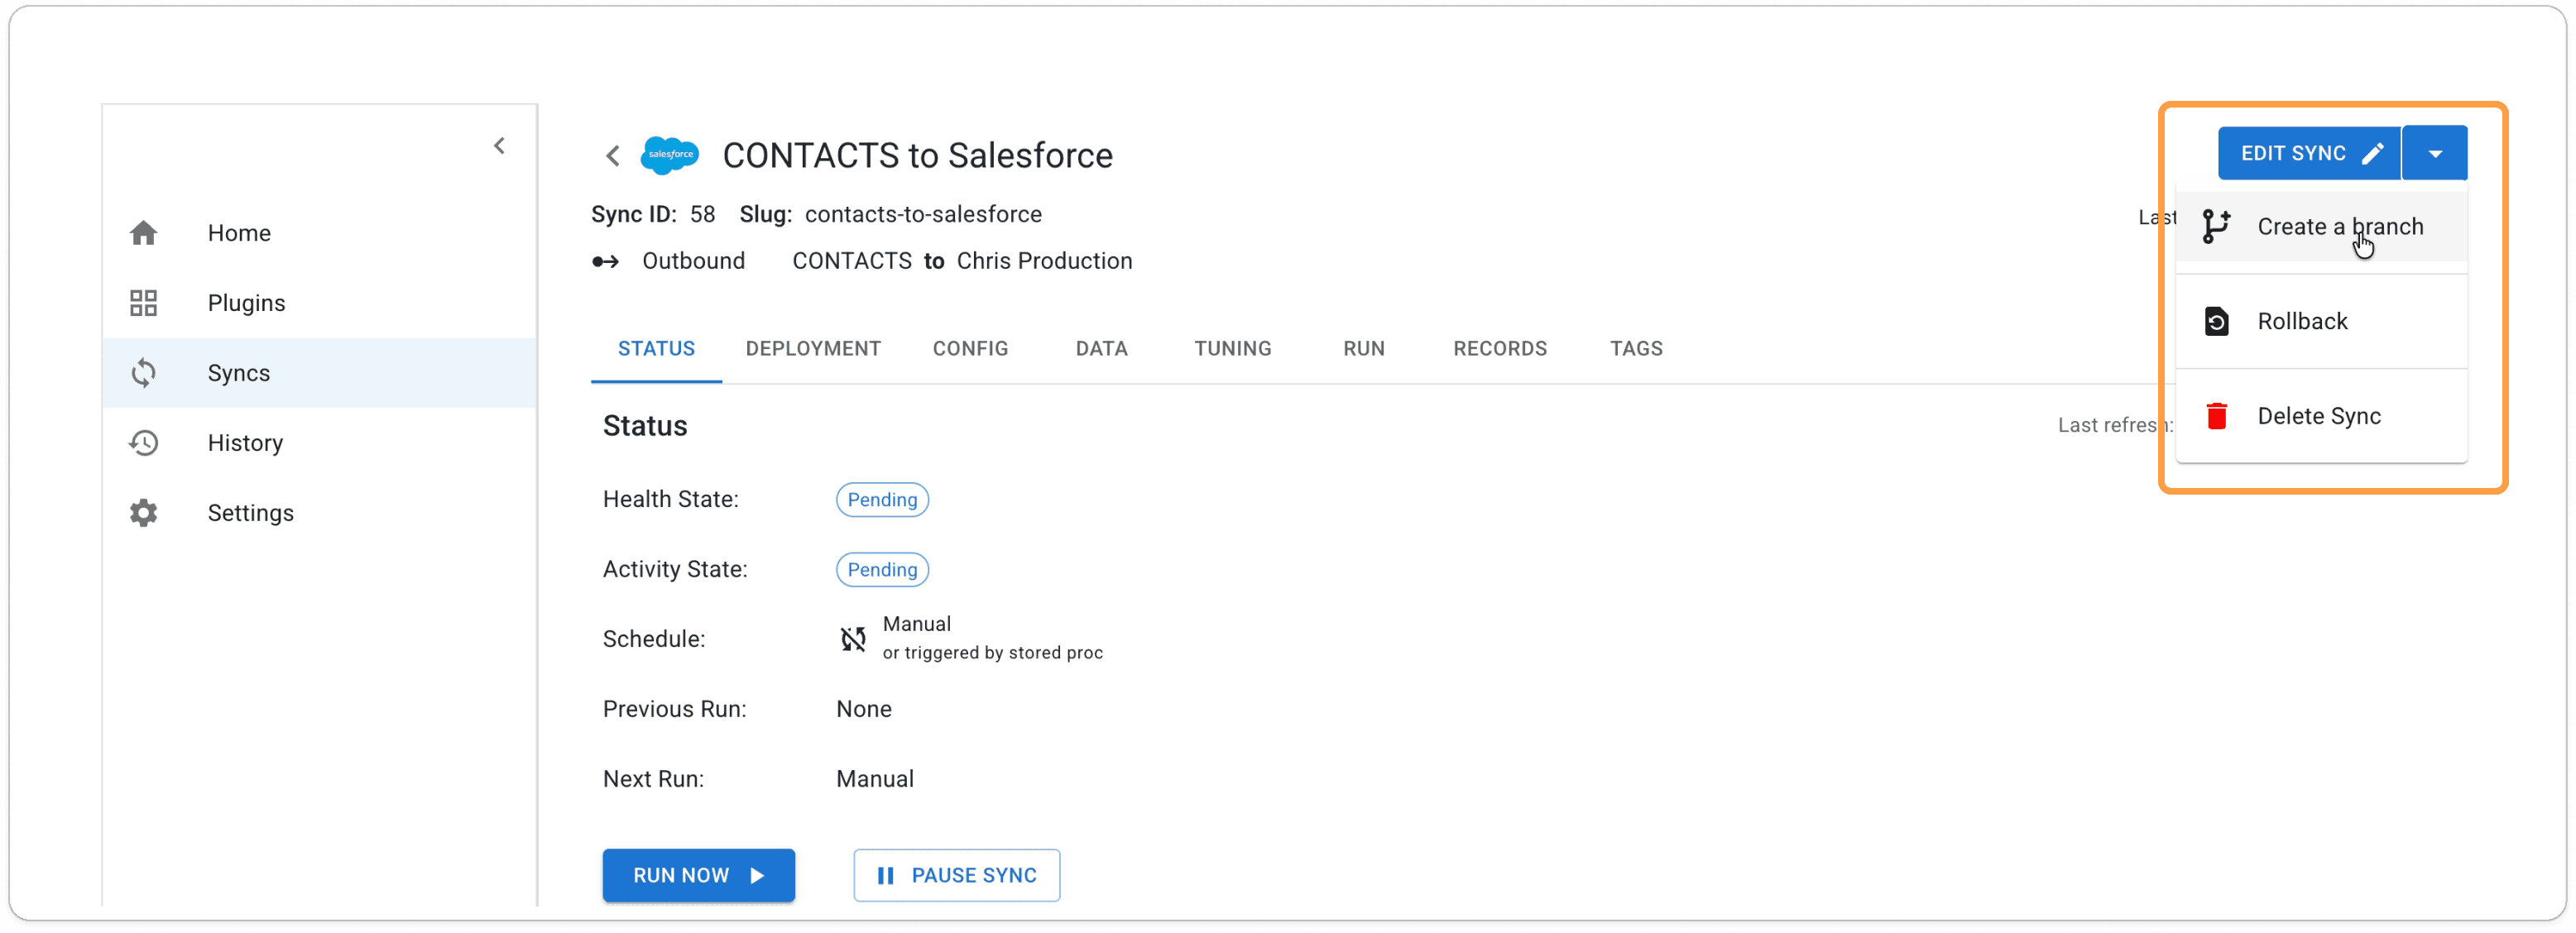
Once you've created the branch, the sync home screen will show both branches now, plus more options on the sync menu button.
Run the branch
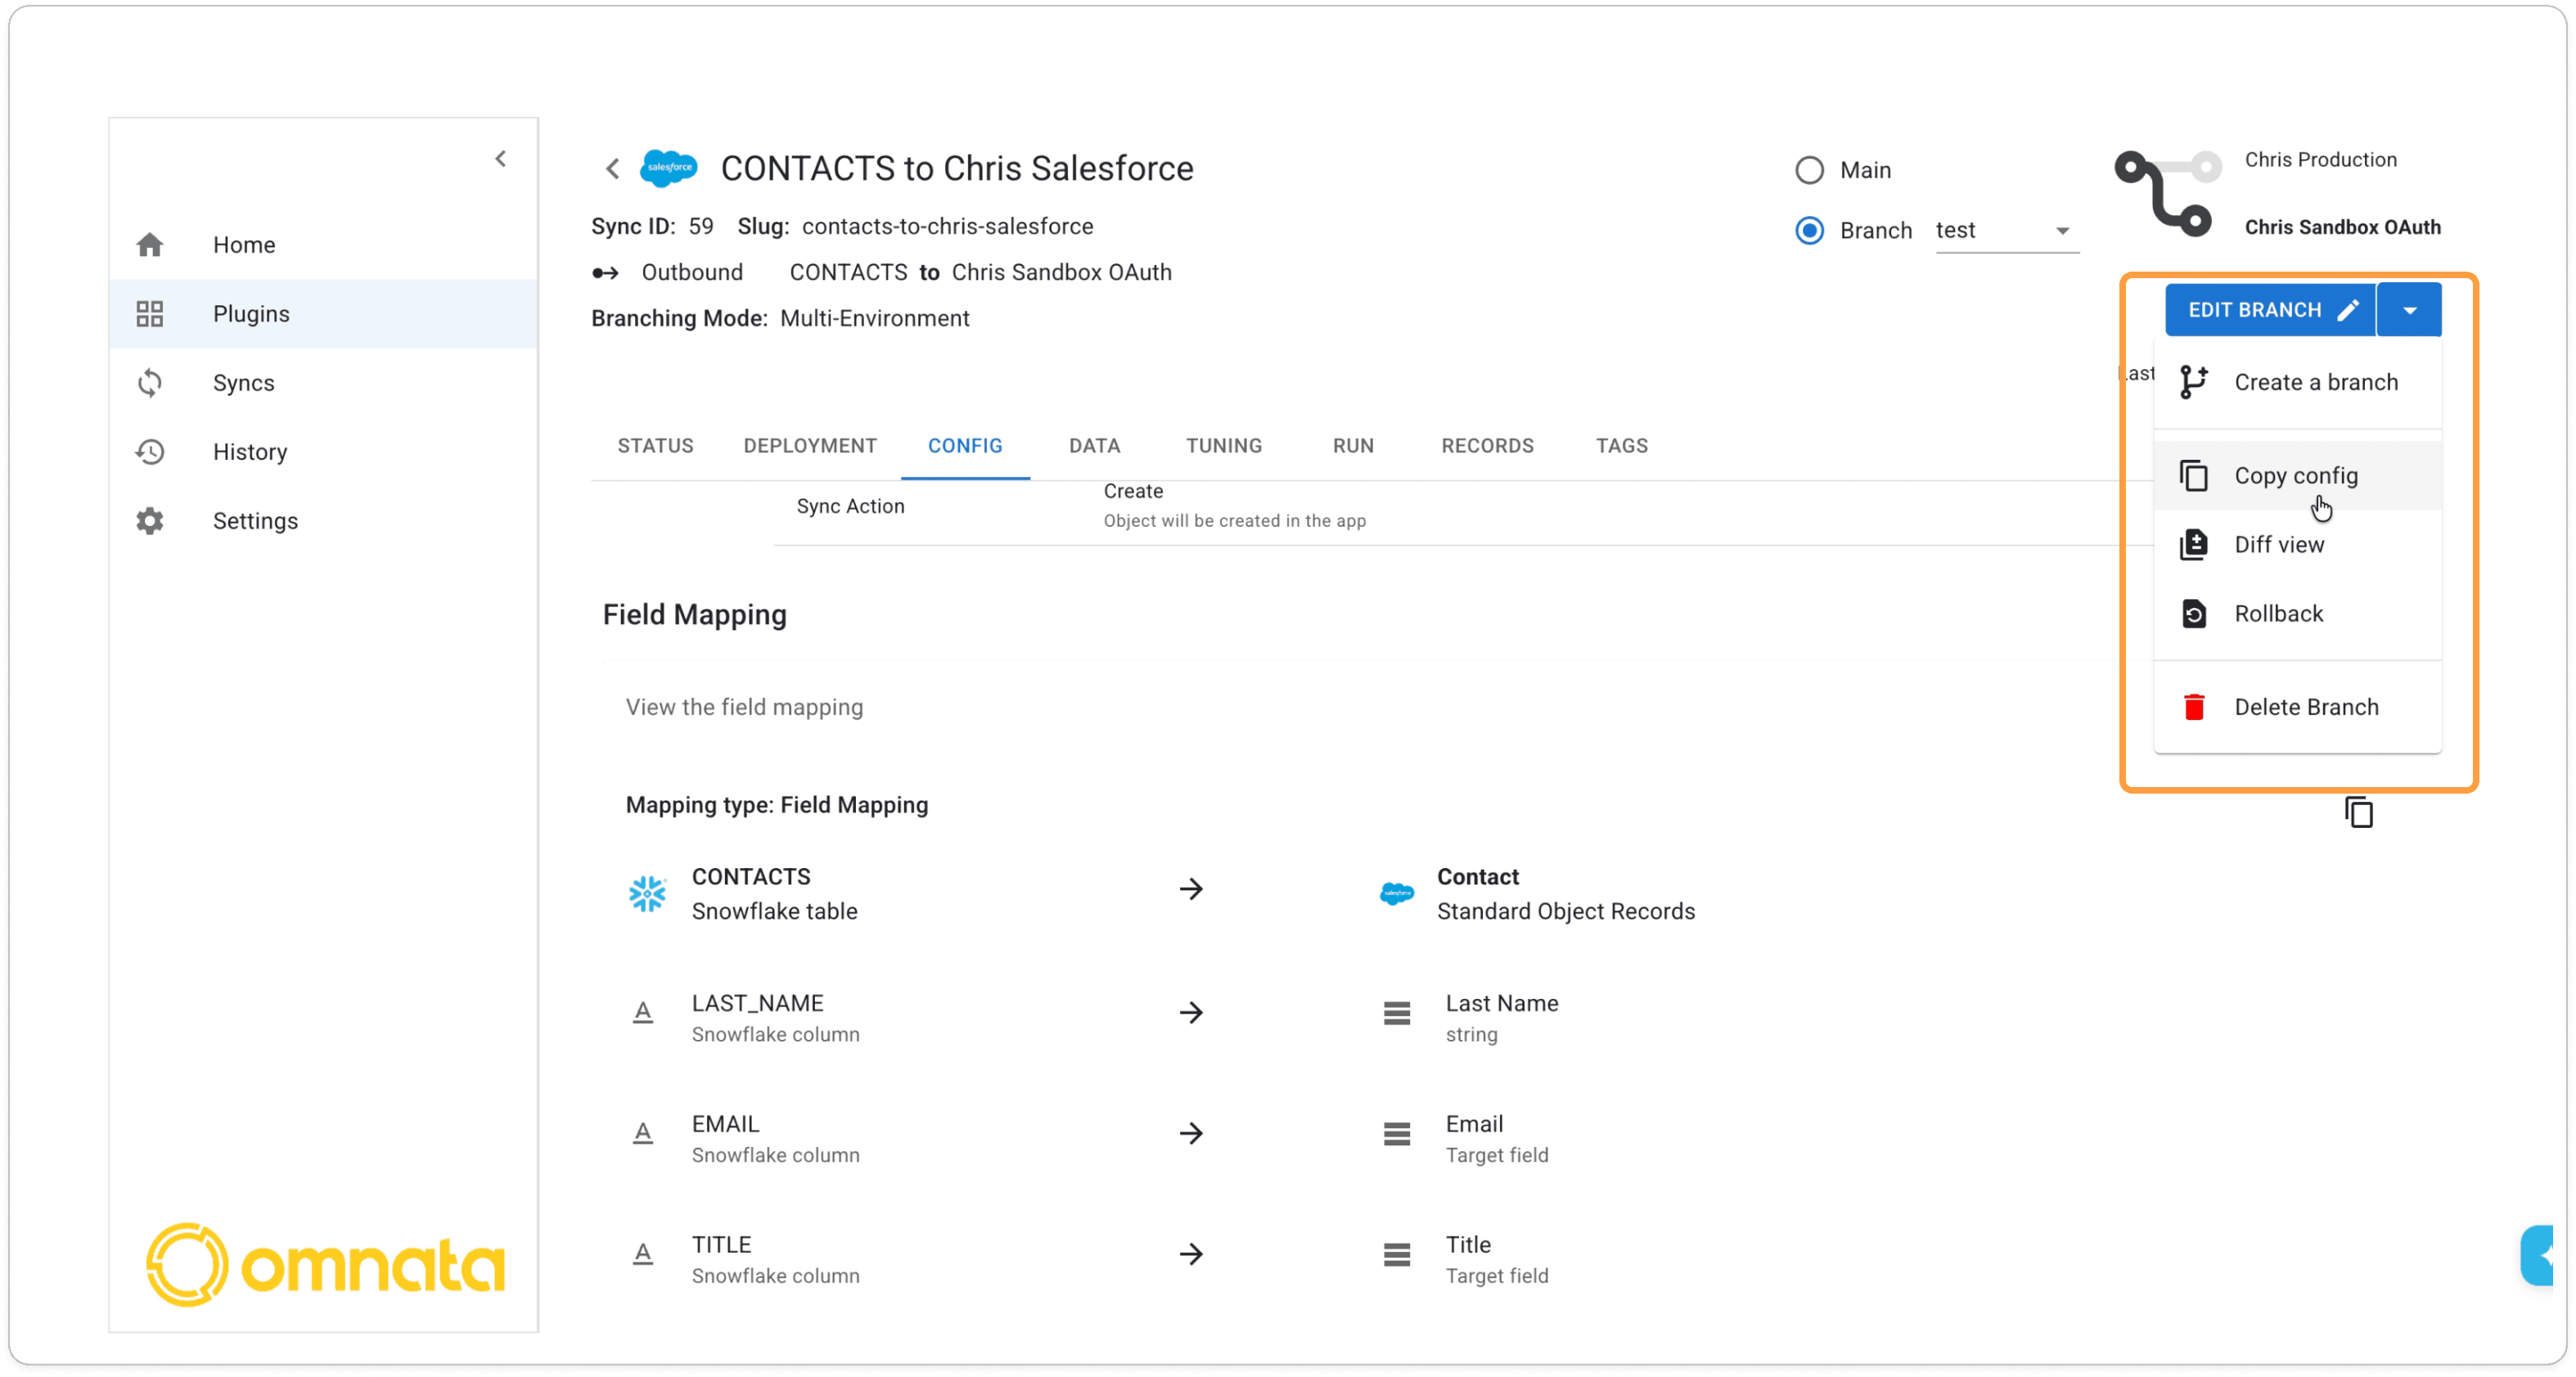
Click Run Now to start the branch sync and check the results. Make any changes and rerun. Once everything looks good, you're ready to promote the configuration.Check the Diff View
Click the menu button on the sync and open the Diff View. This lets you confirm the configuration differences between your test branch and your Main.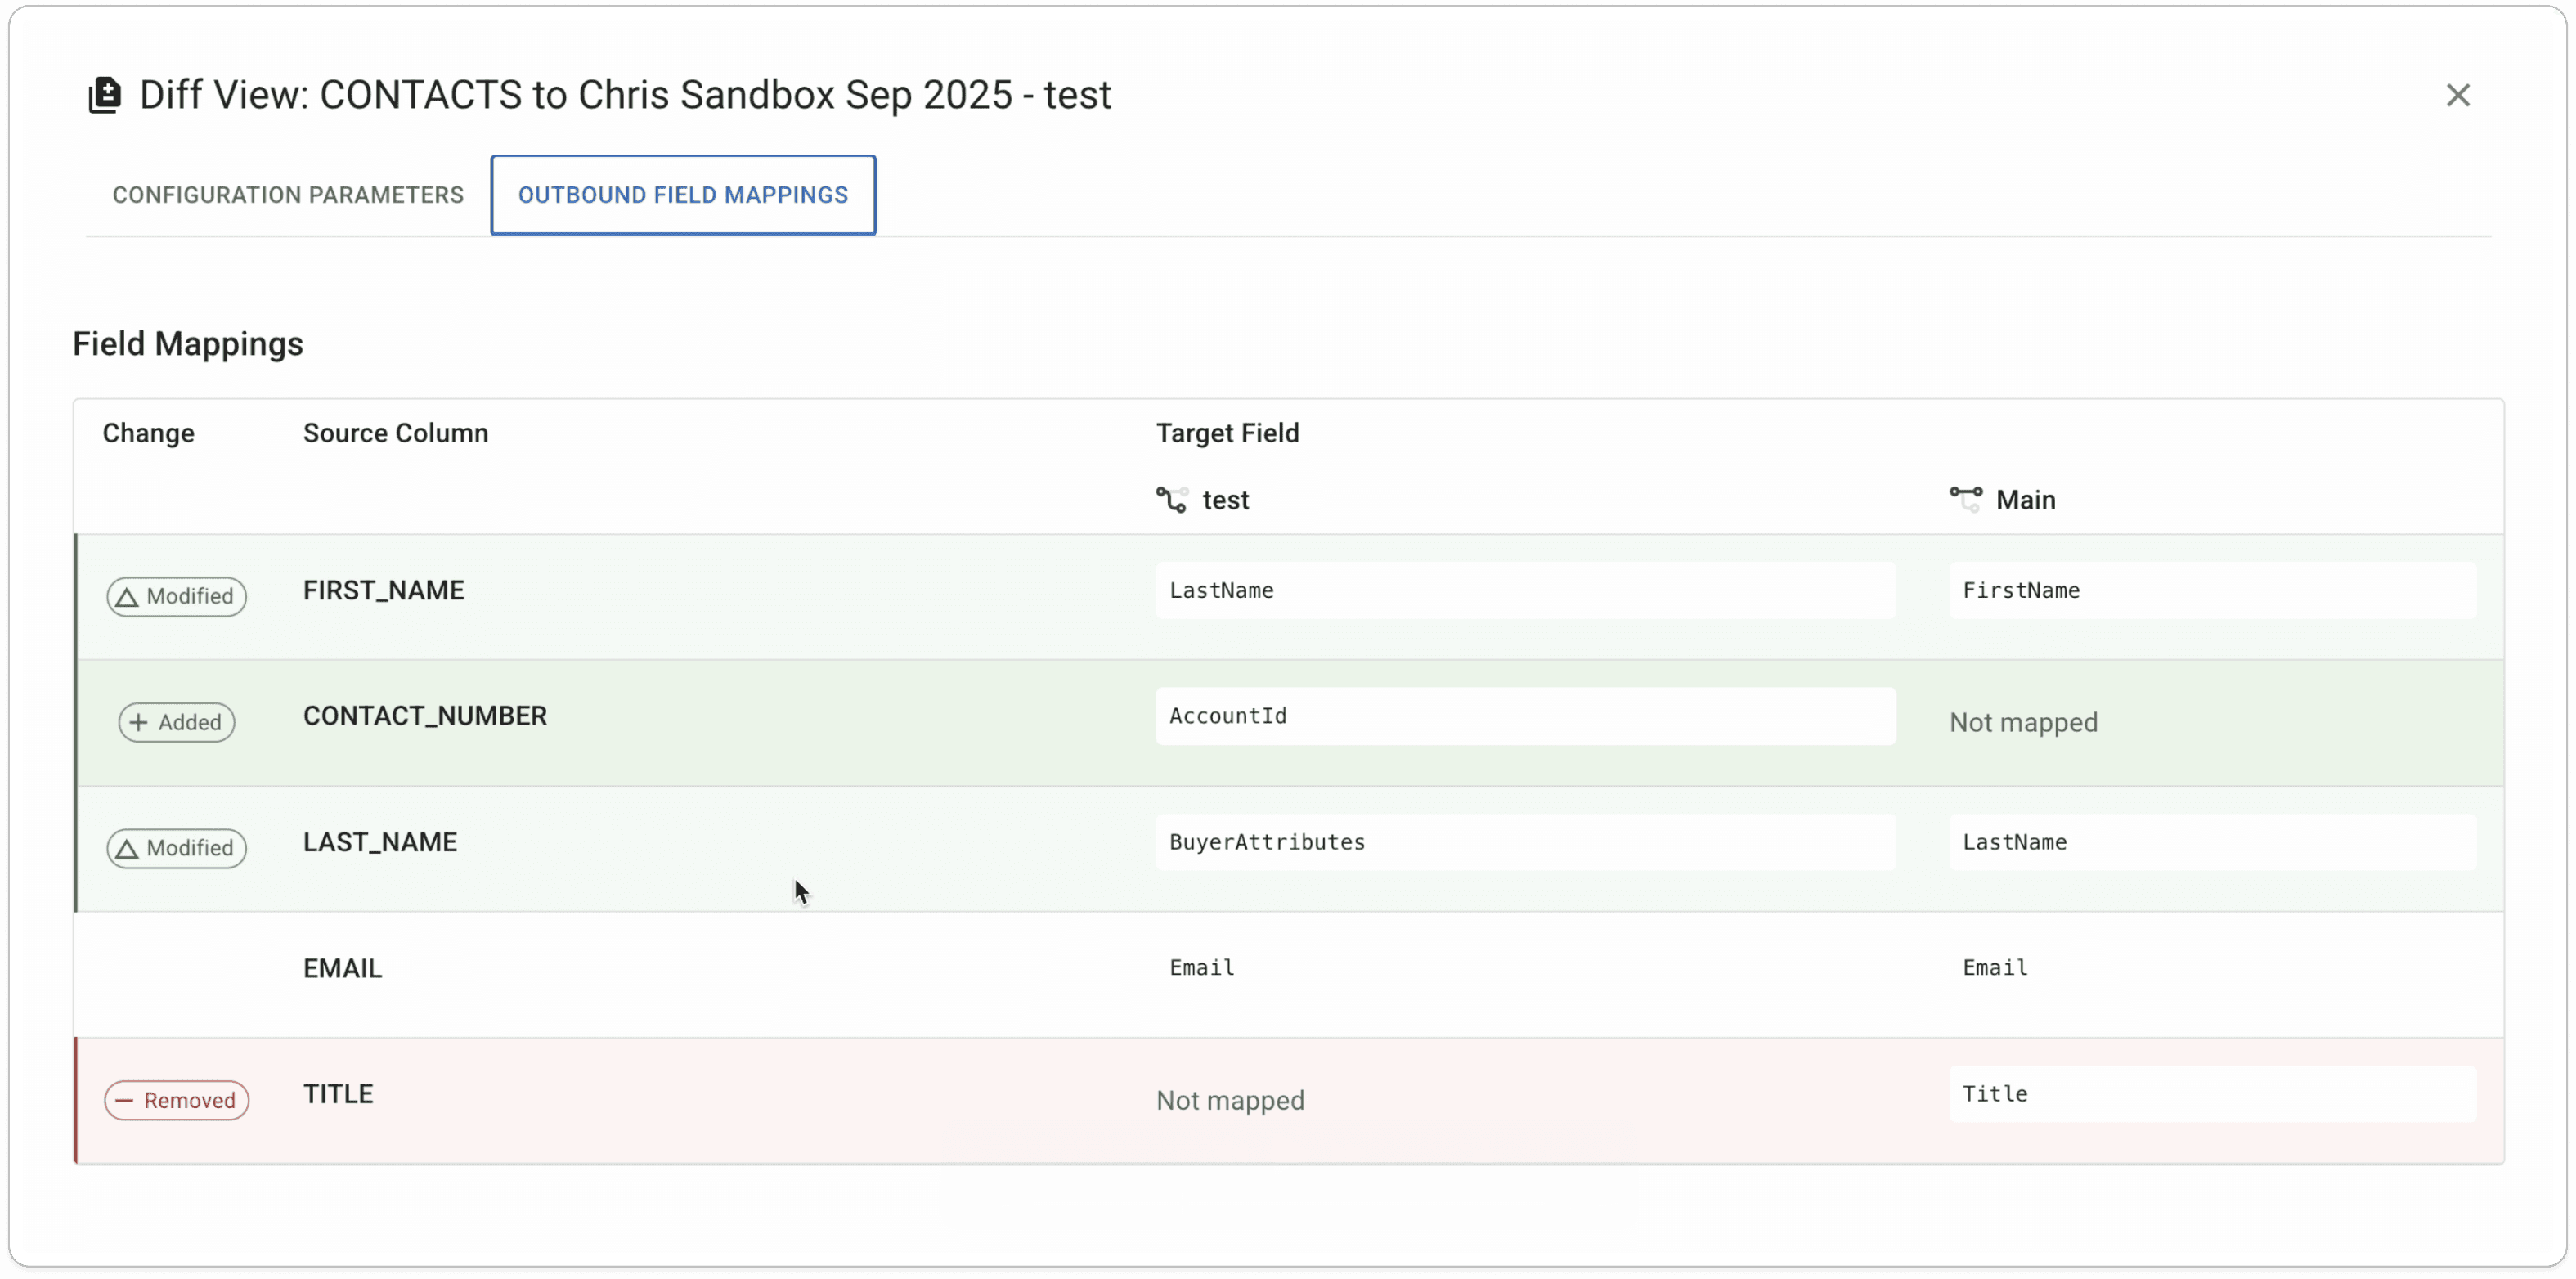
Copy Config to Main
If everything looks correct, click Copy Config and choose Main as the target.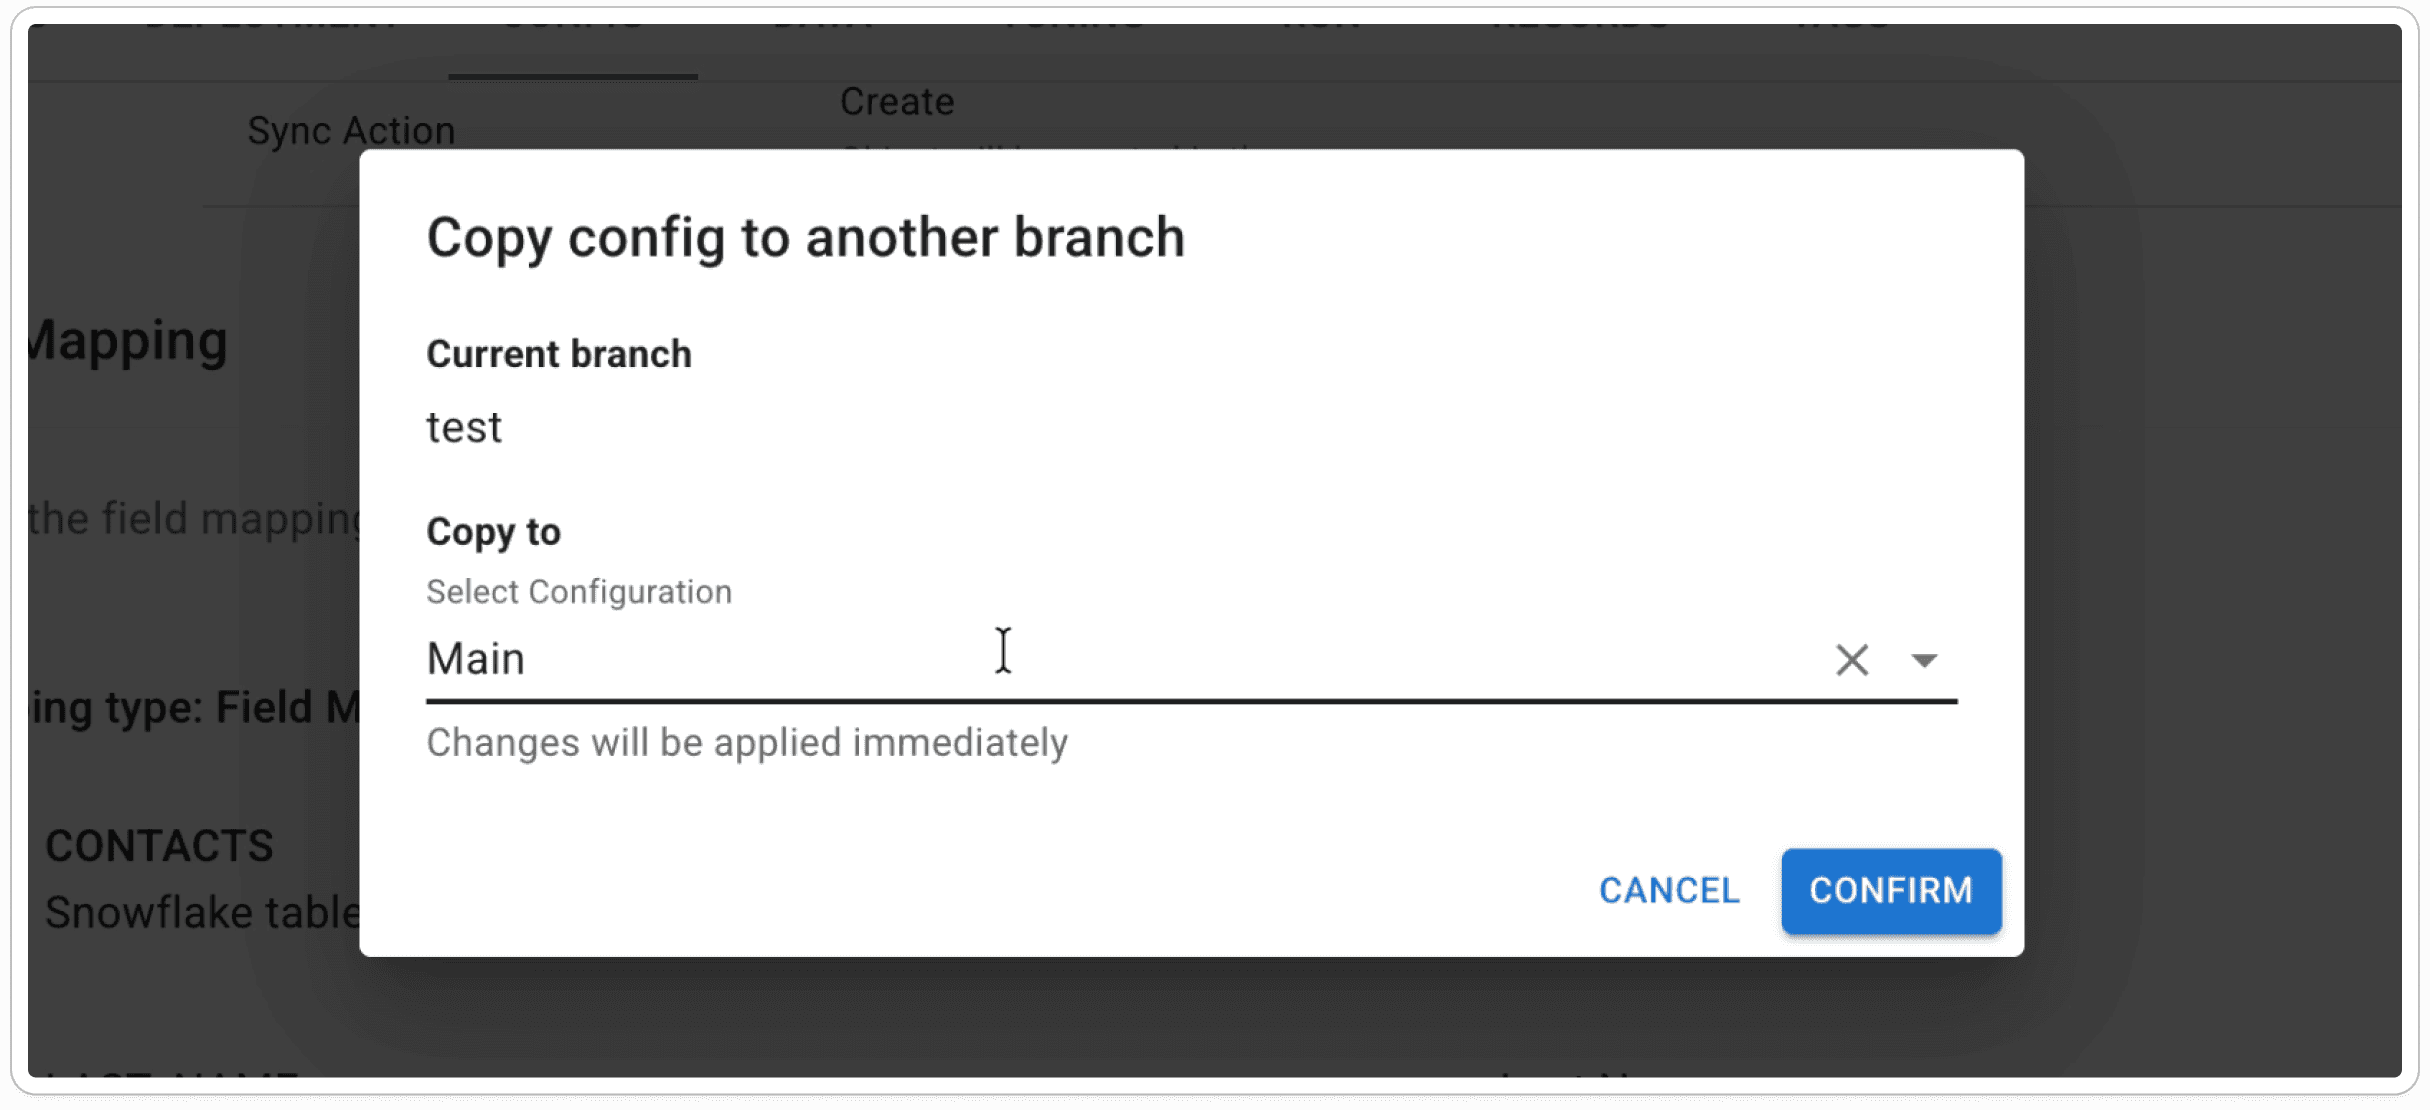
Set the Main schedule — Now that your Main branch is ready to run in production, go to the Deployment tab and set the schedule for the Main branch.
Your sync has now been safely tested and promoted to production.